Southern California Sign Blog

Burbank Sign Co. | Your Checklist For Trade Show Graphic Signage

Posted by Julie and Chris Ramirez on Sun, Dec 16, 2012 @ 06:12 AM

Trade Show Graphics Checklist:

Your Sign Studio consultant knows all the tricks of the trade show. We'll help you: Create a striking design that communicates a clear message and business image. Distill your product information into easy-to-read, bullet-pointed copy. Choose the right color scheme that complements your logo and shows off your products. Select a booth and graphic materials that are durable and lightweight for easy, affordable transport and storage Strategically position graphics to guide traffic flow in and out of your booth space. Keep your trade show booth on budget while also achieving a highly effective, professional look.

The Sign Studio has everything you need to create a powerful trade show exhibition. 

Go to our Electronic Catalog -Exhibitors Handbook for ideas and suggestions. 

Contact The Sign Studio at (818) 843-9200 or send us an e-mail at info@signstudiola.com for assistance.

Sign Quote

Topics: Burbank Sign Company, Exhibitors Handbook for Tradeshows, Trade Show Sign Displays

Burbank Sign Co. | All You Need To Know About Channel Letter Signs

Posted by Julie and Chris Ramirez on Sat, Dec 15, 2012 @ 06:12 AM

Channel Letter Glossary - Need a quick channel letter term definition? Here are a few common ones:

Acrylic: Translucent plastic used as a channel letter face material. Acrylic is available in a wide of colors, and its thickness is typically 1/8" or 3/16".

Channel Back: Aluminum that is routed in the shape of a letter to form its backing.

Cut-off switch: Electrical switch placed on the outside of the building, usually above, below or on a channel letter signs raceway.

Drain holes: Small holes placed at the bottom of a channel letter. Drain holes permit rain and condensation to drain out of a letter's interior.

Electrode: The terminal at the end of a neon tube that connects to a GTO wire. Neon tube fabricators attach electrodes to glass tubes by melting the glass to form an airtight weld.

GTO cable: Insulated electrical wire designed for high-voltage current. GTO cables connect neon tubes.

Electrode boot: A rubber boot designed to be installed on the double back or electrode of a neon tube to protect against electrical shocks or arcing.

LED: An electronic light source for channel letters. LED stands for Light Emitting Diode, and this type of lighting is illuminated by the movement of electrons in a semiconductor material. LED Channel letters are becoming more and more popular.

Neon: Another illumination option for channel letters, neon is a luminous glass tube filled with inert gas. High voltage electricity from a transformer excites the gas to produce light. Tubes may be bent to form various shapes and letters.

Permit: A legal document required by a municipal building department that allows the installation of a specific sign at a designated location. It is illegal to erect a new sign without first obtaining the appropriate permit.

Polycarbonate back: A protective plastic insert cut to the same shape as a reverse channel letter and attached to seal the letter's back. This prevents rainwater entry and also keeps animals from nesting inside the letter. Polycarbonate backs also provide mounting surfaces for neon tube supports.

Raceway: An enclosed aluminum channel (typically 8" by 8") that spans the entire length of the letters. Channel letters are pre-installed on the raceway in the shop, thus simplifying installation in the field.

Return: The side of a channel letter. Returns are commonly constructed of aluminum, and are typically 5" deep.

Tie wire: Thin copper wire that attaches a neon tube to a tube support.

Transformer: A channel letter's high-voltage power supply. Transformers are available in various current outputs, typically ranging from 7500V to 15,000V.

Trim cap: The flexible plastic edging that surrounds a channel letter's face. Trim caps are chemically welded to the face, and are available in a variety of colors.

Tube support: A glass standoff that typically is fastened to a channel letter back to hold neon tubing in place.

UL-approved: Underwriter's Laboratories (UL) is an independent product safety certification organization. UL approval means that all sign components meet UL standards for electrical safety.

Channel Letter Sign Image

If you have any questions, please give us a call at The Sign Studio - (818) 843-9200 or send us an e-mail at thesignstudio@sbcglobal.net

NEED QUOTE

Sign Quote

Topics: Burbank Sign Company, Custom Signs, Channel Letter Sign Quote

Burbank Sign Company | RTA Vinyl Lettering, Logos and Graphics

Posted by Julie and Chris Ramirez on Fri, Dec 14, 2012 @ 06:12 AM

READY TO APPLY LETTERING - also known as RTA Lettering.

If you are looking to save yourself some money and are confident in your application abilities, the following directions on how to apply your own vinyl lettering will help you to install your own signage.

1. Apply window cleaner, soapy water, or denatured alcohol to clean the surface where the lettering will be placed. Use a lint-free cloth to wipe the surface dry.
2. Use a water-soluble pencil to draw guidelines and centerlines to help align the lettering.
3. Fill a spray bottle with a mixture of water and 3 drops of liquid dish detergent.
4. Before applying, rest the lettering on a flat surface and carefully squeegee across the transfer tape that covers the bottom.
5. Find the center of the lettering and make a small mark at that point on the transfer tape.
6. With the lettering face down, peel the backing paper away from the lettering, which will remain adhered to the transfer tape.
7. Lightly spray the exposed sticky side of the lettering with the soapy water solution (if the letters are being applied to glass and are smaller than 1" in height, do not use the spray, it could cause misalignment.) Small letters should be applied dry.
8. Place the lettering and transfer tape onto the surface, using any guidelines and centerlines you have made to help align the lettering.
9. Squeegee the lettering from the center outward toward the edges, overlapping your strokes to prevent air and water from being trapped under the lettering.
10. Leave the application tape attached to the lettering and let it dry for about one hour.
11. Remove the application tape. Put the tape back at a 180-degree angle (flat) to the surface. This will minimize the chance of the lettering being pulled up along with the tape.

If you have any questions of need help with your Installation, please give us a call at (818) 843-9200 or e-mail us at thesignstudio@sbcglobal.net.

The Sign Studio, Burbank CA, RTA signs, vinyl graphics, vinyl application, vinyl signage

Sign Quote

Topics: Burbank Sign Company, RTA Vinyl Lettering Signs, Vinyl Graphics & Logos

Burbank Sign Co. | Sign Installation, Repair & Maintenance Service

Posted by Julie and Chris Ramirez on Thu, Dec 13, 2012 @ 06:12 AM

Sign Repair Service, Maintenance & Installation

The Sign Studio offers fast electric sign repair service for Los Angeles and Southern California areas. Our sign technicians are friendly, fast and efficient. Whether you need neon sign repair, large pole sign maintenance, or even LED sign repair, we are trained to find problems big or small and repair them before they become major.

TROUBLESHOOT
- Our top notch equipment is manned by licensed professionals who are trained and experienced at solving the toughest problems with every kind of sign, lighting, and power systems.
INSTALL - We have the equipment, manpower, and experience to capably install your new sign or replace your existing sign. Pole mount, building mount, ground or pedestal mount, powered or not, we cover all the bases with professionals that can get the job done right!
MAINTAIN - Our professional, licensed technicians are available to provide you with constant care and maintenance of your entire facility's lighting and sign systems. Our customer care department will help with accurate night time surveys to provide you with signage, property, and security lighting maintenance on any schedule. In this way, you are protected and provided with all the information you need to properly maintain your facility.

To schedule maintenance or sign repair please call us at (818) 843-9200, or send us an email. thesignstudio@sbcglobal.net

The Sign Studio is fully licensed, bonded and insured.

Sign Service Areas.
Arcadia, Azusa, Alhambra, Anaheim, Alta Loma, Baldwin Park, Burbank, City of Bell, Bell Gardens, Bellflower, Beverly Hills, Balboa Island, Balboa Beach, Brea, Buena Park, City of Industry, Cerritos, Claremont, Covina, Commerce, Costa Mesa, Cypress, Corona, Chino, Chino Hills, Devore, Diamond Bar, Downey, Duarte, Eagle Rock, El Monte, Fullerton, Fountain Valley, Garden Grove, Glendora, Glendale, Hacienda Heights, Hawaiian Gardens, Huntington Beach, Industry, Irvine, Irwindale, La Puente, La Verne, Los Angeles, La Habra, La Mirada, Lakewood, Long Beach, Lynwood, Montclair, Montebello, Monrovia, Monterey Park, Newport Beach, Ontario, Orange, Pasadena, Pomona, Rancho Cucamonga, Rosemead, Rowland Heights, Rialto, San Dimas, San Gabriel Valley, Santa Ana, San Bernardino, Seal Beach, Sierra Madre, Sunset Beach, South El Monte, Temple City, Tustin, Upland, Van Nuys, West Covina, West Hollywood, Westminster, Yorba Linda.
** Please call if you do not see your city listed.

Sign Quote

Sign Maintenance, Sign Upkeep, Sign Problems

Topics: Burbank Sign Company, Licensed Sign Installation, Sign Service Maintenance Repair

Burbank Sign Company | Sign Letters - Distance and Size?

Posted by Julie and Chris Ramirez on Wed, Dec 12, 2012 @ 06:12 AM

HOW BIG SHOULD I MAKE MY SIGN LETTERS
Lettering size is an important part of sign making because you will need to be sure that your clients can read your message from a distance. Whether it’s storefront window graphics, a banner, or vehicle graphics, make sure that you can read the lettering and logo contained in your message. To maximize readability the standard is that each inch of letter height represents 10 feet of readable distance, meaning that for a sign to be readable from a 30 foot distance the letters should be at least 3 inches tall.

Interior signs that are being read by customers in a retail
store environment need only be an inch or two tall, while an overhead exterior banner being read from a nearby street or highway would need much larger letters in order to be seen from a distance. Also, font selection will play an important role as some fonts are thin and script like, while bolder fonts and capitalization (with appropriate spacing) can improve readability. Trying to skimp or economize by using a smaller lettering size is definitely not a wise decision. See The Sign Studio’s Legibility/Readability chart below for an example assuming Helvetica upper case black lettering on a white background.
 
READABILITY/LEGIBILITY CHART

Sign Readability Chart Image


If you have any further questions or need any signage information, please give us a call at (818) 843-9200 or send us an e-mail at thesignstudio@sbcglobal.net.
Need a Quote from The Sign Studio?

Sign Quote


Topics: Sign Design, Burbank Sign Company, Sign Letter Size

Burbank Sign Co. | Vehicle Magnetic Signs - How to care for and install.

Posted by Julie and Chris Ramirez on Tue, Dec 11, 2012 @ 18:12 PM

Magnetic Signs

Instructions for Magnetic Sign Installation and Maintenance
THE SIGN STUDIO
uses the finest magnetic material to bring you the best in mobile magnetic advertising. Correct preparation, installation, maintenance, and storage procedures should be followed, see (Sections 1 - 4.) Following these instructions will help to ensure your satisfaction and to safeguard the long life of your signs and vehicle. Due to the many variables and complex nature of automotive finishes, special care must be taken to protect your vehicle: check the area behind the magnetic material weekly and move the sign as necessary to prevent any discoloration or clouding of the automotive clear coat.

The Sign Studio, Burbank CA, Car Magnetics, car signs, vehicle signs, magnetic signs

1. PREPARATION: Wash and dry vehicle. To protect your signs and vehicle, wax vehicle surface and the brown magnetic side of the sign prior to applying.
2. INSTALLATION: Magnetic signs can only be used on smooth steel surfaces. They CANNOT be used on simulated wood-grain panels, fiberglass panels, panels that have been repaired with a non-steel filler (such as -Bondo), or on any corrugated or other irregular surfaces. If necessary, magnetic signs can easily be cut with a razor or X-Acto knife to work around body molding or other obstructions on the vehicle. Apply one edge of the sign to the vehicle surface in the desired location then roll the sign onto the vehicle surface until the entire sign is installed flat onto the vehicle surface. If the magnetic sign is not placed in the desired position, carefully remove by reversing the installation steps and then repeat the process. (Do not try to rearrange the sign by pulling when it is stuck magnetically onto the vehicle. This might stretch the magnetic as well as scratch the vehicle paint!)
*** Note: A magnetic sign should never be applied to a newly painted vehicle. Allow at least 60 days for fresh paint to cure.
3. REMOVAL & MAINTENANCE: Remove the signs from your vehicle weekly. Always remove the sign by lifting from the center of the two opposite sides-never start at the corners, as this may stretch the sign material. In cold weather, preheat the sign with warm water before removal, if necessary. Once the signs are removed, wash and dry the vehicle and all sign surfaces. This keeps moisture from collecting between the signs and the vehicle surface, which can potentially damage a vehicle's finish. To clean the signs, use a sponge and a mild soapy water solution. Never immerse the signs in water, steam clean, or take them through a car wash. A generous coat of wax on the surface where the sign is placed and on the back of the sign itself will help prevent damage. After rain or snowfall, remove signs and wipe dry.
4. STORAGE: Magnetic signs should be stored either on a flat, even surface, or rolled up (lettering to the outside) around a cylinder with a diameter of at least 3". Never store magnetic signs in a hot vehicle, as they may permanently warp. Do not damage signs by folding, creasing , or placing any heavy objects on top of them. This type of treatment will prevent the signs from retaining their full magnetic power. If a sign does get bent out of shape, you can try to straighten it by placing it on a flat metal surface, such as a file cabinet or refrigerator. If you cannot straighten the sign, it will need to be replaced. WARNING: Automotive finishes and protectants vary by manufacturer; changes in color, shade, and surface appearance can occur with time, daily usage, and exposure to direct, intense sunlight. For care of your automotive finish, please refer to your vehicles Owner's Manual.

Please give us a call at (818) 843-9200 or send us an e-mail at thesignstudio@sbcglobal.net if you have any further questions.

NEED A QUOTE

Sign Quote

Topics: Burbank Sign Company, Magnetic Vehicle Signs, Magnetic Sign Design

Burbank Sign Co. | Public Notice - Development Review Sign Information

Posted by Julie and Chris Ramirez on Tue, Dec 11, 2012 @ 06:12 AM

DEVELOPMENT REVIEW
PUBLIC NOTICE SIGN REQUIREMENTS

Unless specifically waived, all applicants for Development Review (DR) are required to post a sign on the project site providing public notice of the pending development application. This is in addition to the mailing of notices to nearby property owners and tenants.

Requirements for the design, construction and placement of the sign are as detailed below.

1. The sign is to be erected on the project site at least 10 days prior to the Director’s Decision dated. The sign is to be removed after the Development Review appeal period has ended. If the determination is appealed, the sign is to be removed after the appeal has been decided.

2. Sign specifications and design:

a. Size: 8 feet long by 4 feet tall

b. Height: Not to exceed 6 feed including support posts

c. Location: Not less than 1 foot inside front property line, clearly visible and facing street

d. The sign must be constructed of plywood or a similar sturdy material. Paper or cardboard is not acceptable. The sign must be supported by two posts with a minimum size of 4 inches by 4 inches, with proper footing if required.

e. The background of the sign must be white with a border 1 to 4 inches thick. The border must be black or another dark color that contrasts with the background.

f. Lettering must use a font that is readily legible and as large as possible given the amount of text necessary to fit on the sign. The lettering must be black or another dark color that contrasts with the background.

g. Sign format is subject to approval b the City Planner.

3. Sign Copy: as shown below and in graphic.

Please see our sample below and if you have any questions or need The Sign Studio to prepare your design/layout and post & panel sign for you, please give us a call at (818) 843-9200 or send us an e-mail at thesignstudio@sbcglobal.net.


NEED A QUOTE

Sign Quote

Topics: Burbank Sign Company, Development Review Sign Requirements, DR Sign Public Notice

Burbank Sign Company | Warning & Safety Signs Need To Be Effective!

Posted by Julie and Chris Ramirez on Mon, Dec 10, 2012 @ 06:12 AM

Why Do Safety Signs Matter?

Safety signs, tags and warning labels are an essential feature to any plant or business, and comprise one of its most important assets. By not using proper effective safety and warning signs, you run a risk of danger that isn't worth the risk.

Safety Signs Hints on Designing an Effective Warning Sign

To make your signs and labels as effective as possible, follow these hints.
1. Choose the Proper Header - The header helps get the sign noticed.
2. Choose the Right Material - Installation and ordering costs are often more than the sign itself. As a result, a durable sign always pays for itself with reduced labor.

3. Use Bilingual Warnings - Although the use of a symbol is strongly encouraged in order to better communicate hazard information across language barriers, more and more warnings themselves are now shown in two languages.

4. Learn about the New ANSI Standard - The new ANSI standard for safety signs emphasizes custom design. It suggests that you add an Action statement, consequences, a symbol, use mixed case and, in many situations, add emergency information.

If you have any further questions or if you need us to design and manufacture your signs, please give us a call at (818) 843-9200 or e-mail us at thesignstudio@sbcglobal.net

NEED A QUOTE

Sign Quote

Topics: Burbank Sign Company, Safety & Danger Warning Signs, Electrical Hazard Signs

Burbank Sign Co.| Vinyl Logo Graphics and Lettering Are Resourceful!

Posted by Julie and Chris Ramirez on Sun, Dec 9, 2012 @ 06:12 AM

Vinyl Wall Lettering & Graphics for Home and Office

THE SIGN STUDIO is an Expert on vinyl wall lettering and vinyl wall graphic products.
Our solutions are employed in retail businesses and in the private sector. Vinyl wall lettering can open a customer's eyes using largely untapped areas of a showroom. Why not wrap vinyl wall lettering throughout a demo area, waiting room, treatment center, conference room, you name it, THE SIGN STUDIO has done it! Our wall lettering and wall graphic solutions deliver!

We can help design and implement a theme throughout an interior space with our advanced software and signmaking equipment. Sell more, promote more, and inform more by using THE SIGN STUDIO'S vinyl wall lettering. We are capable of decorating large and small areas, using materials that can be removal-resistant or purposely removable. Have you seen the professional sports stars that stick to a wall and are removable and reusable? We make those for your young soccer star, little league ace or football prodigy!

Many displays at historic places and museums have been created by THE SIGN STUDIO to educate visitors and enthusiasts. If you can conceive it, we can make it happen with our vinyl wall graphics. We have so many colors and designs you can incorporate into your vinyl wall graphics, or let us use your established symbols, logos and designs. THE SIGN STUDIO is the best place to purchase vinyl wall graphics and lettering, we have the experience to give your walls a makeover.

These are examples of successful uses for THE SIGN STUDIO vinyl wall lettering and graphics:
• Hotels
• Convention Centers
• Real Estate "coming soon" Decor
• Museums
• Government Offices
• Medical Offices
• Internet Cafes
• Day Care Centers
• Automotive Sales Center
• Vocational Training Centers
• Shopping Malls
• Corporate Conference Rooms
• Sports Venues
• Themed Restaurants
• Schools
• Coffee Shops
• Model Home Centers
• Movie Theaters
• Hospitals

Wall Vinyl, Wall Graphics
If you're interested in learning more about THE SIGN STUDIO'S Vinyl Wall Lettering for your business or personal use or if you have any further questions, please call us at (818) 843-9200 or send us an e-mail at thesignstudio@sbcglobal.net

Need A QUOTE

Topics: Burbank Sign Company, Vinyl Lettering Signs, Vinyl Wall Sign Graphics

Burbank Sign Company | ADA Handicap Restroom Signs with Braille

Posted by Julie and Chris Ramirez on Sat, Dec 8, 2012 @ 06:12 AM

ADA RESTROOM SIGNS

Restroom ADA Signs

New ADA Laws and Regulations

Many businesses don't realize there is a far-reaching and organized series of laws and procedures that govern bathroom signs and handicapped signage. The ADA, the Americans with Disabilities Act, was enacted to give due diligence to making sure that all public spaces, including restrooms and places where industrial signage is needed, are accessible and familiar to the handicapped person.

Recently, the laws regulating ADA restroom signs, and all ADA signs in general, have changed. New legislation has brought all the old ADA signage up to modern codes, and compliance is a must.

ADA signage refers to a lot of different laws and regulations, but some of the ADA restroom signs in particular that have been significantly affected by the new rules are braille signs. Braille signs are one of the most important aspects of restroom signage that ADA regulates, and with good reason. There are dozens of possible pitfalls when it comes to creating a braille sign, not least among them positioning, changes in braille itself, height, and prescribed size and lettering. For a handicapped person, it's absolutely essential that your bathroom signs speak to them in a way that they understand and are familiar with. These new laws make it that much easier to create informative, helpful, safe ADA restroom signs, and to create a braille sign that speaks to the widest possible audience as clearly as it can.

ADA signage is something that's easy to overlook in the rush to get through a job, or to design your interior space in a way that's pleasing to the eye and works with your business, school, hotel, or place of business. However, few things are more important about your ADA restroom sign than the way it speaks to the disabled. The right braille sign, the right ADA sign of any stripe, is designed to keep your business in good standing in two ways. One way is compliance. Without it, your space could be subject to penalties and even lawsuits, and that's never a good thing. The other way is simple customer/occupant care and service. Without the right kind of ADA signage, your handicapped patrons will have a harder time doing what they need to do in your space. Both of those simple, very compelling reasons for updating your signs are focused on here at The Sign Studio. .

Below you'll find a run down of many of the new ADA sign regulations that relate to industrial signage and braille signs. As a service to you and a guideline for how we make our signs in the future, we're placing these ADA regulations on our site - check back to reference them whenever you need. The Sign Studio is your one-stop shop for any kind of braille sign, ADA signage, or any type of state and federal law-compliant sign.

New Regulations Related to Braille Signs

According to the new regulations, when you're writing in braille there are several guidelines in reference to size, height, and font. For example:

"Letters and numerals shall be raised 1/32 in (0.8 mm) minimum, upper case, sans serif or simple serif type and shall be accompanied with Grade 2 Braille. Raised characters shall be at least 5/8 in (16 mm) high, but no higher than 2 in (50 mm). Pictograms shall be accompanied by the equivalent verbal description placed directly below the pictogram. The border dimension of the pictogram shall be 6 in (152 mm) minimum in height."

There are minimums for how far braille must be raised above the surface of your ADA sign, and at The Sign Studio we have the precision machines to get it just right, keep you compliant, and make your signs readable and accessible. We also are completely updated and able to write in perfect Grade 2 Braille, a capability not all sign companies share. We also are well trained and well versed when it comes to all ADA signage symbolics, and all related braille sign explanations and text.

Another set of regulations for braille signs:

Dot diameter: .059 in.
Inter-dot spacing: .090 in.
Horizontal separation between cells: .241 in.
Vertical separation between cells: .395 in.
Raised borders around signs containing raised characters may make them confusing to read unless the border is set far away from the characters. Accessible signage with descriptive materials about public buildings, monuments, and objects of cultural interest may not provide sufficiently detailed and meaningful information. Interpretive guides, audio tape devices, or other methods may be more effective in presenting such information.

As you can see, that kind of minute detailing requires incredible precision. That's why The Sign Studio has invested in the best, sharpest sign creation equipment. With laser precision, we can make ADA restroom signs to absolute perfect margins and regulations, and every ADA sign we make for your company can be crafted with amazing exactitude.

That's important not only to make your signs compliant, but also to make them readable. For braille users, it's important that braille signs be the same as the braille they read in texts, to cut down on confusion. Confusion that could range from mere frustration to the possibility of danger, neither of which serve you, your place of work, or your guests.

The signs in your space are important on a number of levels, but few of them are more important than respect and customer service. Making the best braille sign possible, in compliance with all ADA signage laws and regulations, is a great way of accomplishing both of those goals, and making them with precision and excellence is a point of pride for The Sign Studio. There are several other laws regulation ADA restroom signs. They include regulations related to height, spacing, and sign placement.

For instance, all ADA signs intended for use by handicapped persons have to be placed in locations free from any sort of unseen danger, such as the arc of a swinging door, or a protuberance along the wall. A braille sign has to be in a place where the user can feel safe standing still and reading it for any period of time.

"Letters and numbers on signs shall have a width-to-height ratio between 3:5 and 1:1 and a stroke-width-to-height ratio between 1:5 and 1:10."

This regulation ensures that the characters on a given sign will conform to other characters on other signs, making them familiar and readable. This goes for all kinds of ADA signage, and is one more way these ADA regulations make the world of interior space more palatable and easier to navigate for the handicapped.

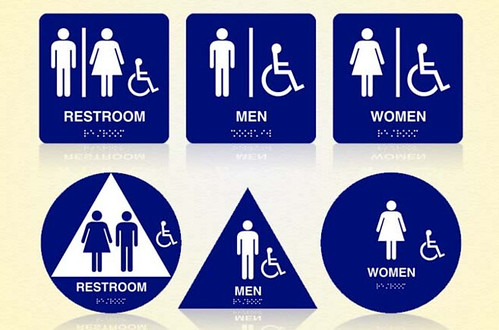
There is also a regulation mandating that all bathroom signs be high contrast. In other words, if your writing is in a light color, like white, it must be contrasted with a darker background, like blue. You see this combination in a lot of different handicapped signage. The contrast must be 70% to be in full compliance, and the ADA provides a helpful equation to help businesses know how much contrast is enough:

Contrast = [(B1 - B2)/B1] x 100


where B1 = light reflectance value (LRV) of the lighter area and B2 = light reflectance value (LRV) of the darker area. Note that in any application both white and black are never absolute; thus, B1 never equals 100 and B2 is always greater than 0. The greatest readability is usually achieved through the use of light-colored characters or symbols on a dark background.

All of these rules and regulations are essential in crafting the most up-to-date, ADA compliant signs possible. For handicapped persons and those who depend on braille, the new regulations are essential to an improved, more familiar quality of life. The new braille signs that will now be produced are alone worth the effort of bringing your signs up to code. Using literary spacing and Grade 2 braille is an important step in leveling the playing field of industrial signage.

And when it comes to code-compliant, customer service oriented ADA signage, including of course ADA restroom signs, there's no better place to go than The Sign Studio.

If you have any questions or need further information, please give us a call at (818) 843-9200 or send us an e-mail at thesignstudio@sbcglobal.net


Topics: Burbank Sign Company, Men and Women Restoom Signs, ADA Restoom Signs